Flushing your DNS cache can resolve connectivity issues, ensure your computer accesses the most up-to-date versions of websites, and enhance overall browsing performance. Whether you’re using Windows 11 or a Mac, knowing how to flush DNS is a simple yet powerful tool in your troubleshooting toolkit.
In this guide, we’ll walk you through how to flush DNS, covering both Windows 11 and Mac systems, and include the exact flush DNS command you’ll need.
Table of Contents
What Is DNS Cache
Before diving into the steps, it’s helpful to understand what DNS cache is. Your system stores temporary records of DNS lookups—essentially, address book entries that map domain names (like google.com) to IP addresses. Over time, this cache can become outdated or corrupted, leading to issues like:
- Websites not loading properly
- Outdated content being displayed
- Security risks due to cached malicious addresses
That’s where flushing your DNS comes in.
How to Flush DNS on Windows 11
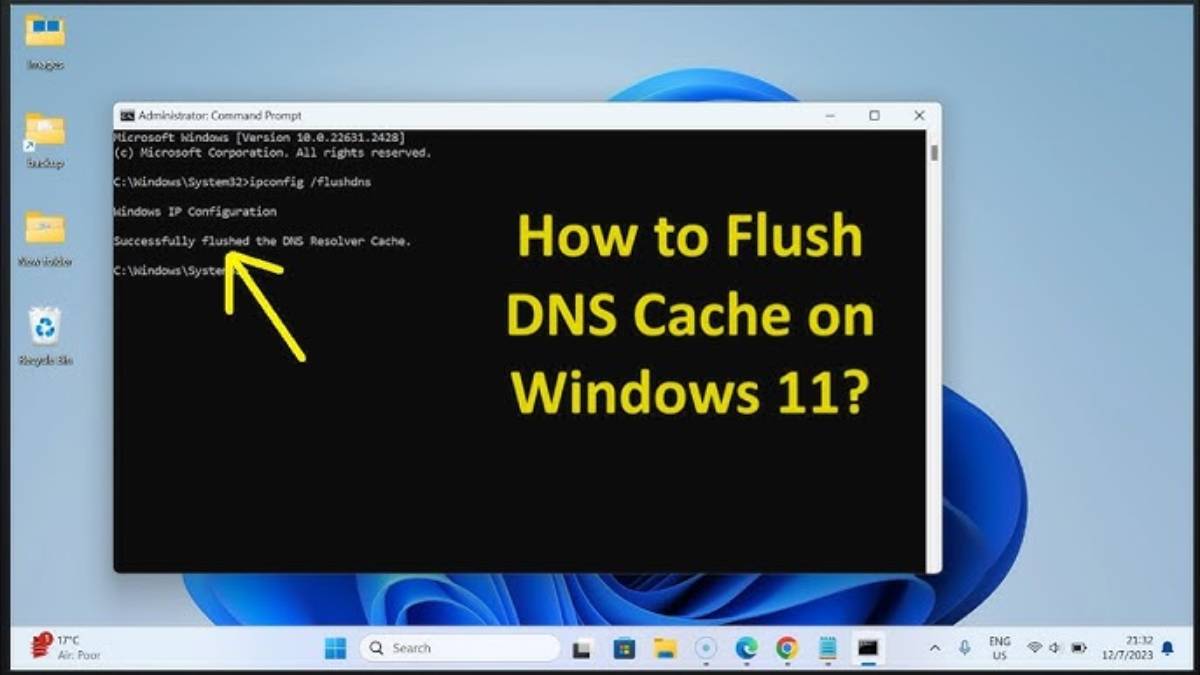
Flushing the DNS cache in Windows 11 is quick and easy. Here’s how to do it:
Steps:
- Press Win + S to open Search, type cmd, and choose Run as administrator for Command Prompt.
- In the Command Prompt window, type the following command:
bash
CopyEdit
ipconfig /flushdns
- Press Enter.
You’ll see a confirmation message like:
“Successfully flushed the DNS Resolver Cache.”
This is the standard flush DNS command for Windows.
How to Flush DNS on Mac
On macOS, the command to flush the cache varies slightly depending on the version you’re using. Here’s a general method that works on most recent versions including macOS Ventura and Monterey.
Steps:
- Open Terminal. You can find it via Spotlight (Cmd + Space, then type “Terminal”).
- Copy and paste the following command:
nginx
CopyEdit0
sudo dscacheutil -flushcache; sudo killall -HUP mDNSResponder
- Press Enter and type your admin password if prompted.
You won’t see a confirmation message, but the cache will be cleared.
Note: If you’re using an older version of macOS, the command may differ slightly. For example, macOS Yosemite uses:
nginx
CopyEdit
sudo discoveryutil mdnsflushcache
When Should You Flush Your DNS Cache
You should consider flushing your DNS cache if:
- A website isn’t loading correctly
- You’ve changed DNS settings
- You’re seeing incorrect IP address resolutions
- After malware removal or security concerns
Recap: Flush DNS Commands
| System | Command |
| Windows 11 | ipconfig /flushdns |
| Mac (modern) | sudo dscacheutil -flushcache; sudo killall -HUP mDNSResponder |
Final Thoughts
Knowing how to flush DNS is a handy skill whether you’re troubleshooting a network issue or just want to ensure you’re seeing the most accurate version of a website. Both Windows 11 and Mac make it simple with just one command. Be sure to bookmark this guide for future reference.